In this article, you will see one workaround for how to print filled Google Forms by using Microsoft Excel and Microsoft Word as helpers.
Let us say that you have created a Google Form, published it and started to collect responses. If you choose “New spreadsheet” as response destination, then you should know that a separate Google spreadsheet will be created, where all of the submitted answers will be stored. Each field of the form is represented as column in the spreadsheet, and each row of the spreadsheet corresponds to a different person who submitted their answers.
Although paperless working is much more convenient, there will be situations when you need to print collected answers in the same format, as they would be filled out on a paper. Reasons for doing this could be various, such as keeping hardcopy archive of official documents. On other hand, having a form with a lot of fields means having a spreadsheet with a lot of columns.
Steps for printing responses submitted through Google Form
The procedure consist of 3 main steps:
1. Preparation:
– Download the Google Spreadsheet with responses in xlsx format.
– Using Microsoft Word, design the outlook of the Google Form as offline version.
2. Using the Mail Merge Wizard in Microsoft Word, connect the data fields from the Excel file to the corresponding fields in the previously designed form in Word (step 1).
3. Finish the merge, review and print the results.
Tip: Before you begin, it is recommended to create a dedicated folder on your computer where you will save all working data regarding this issue.
When you are done with steps 1, start the mail merge wizard:
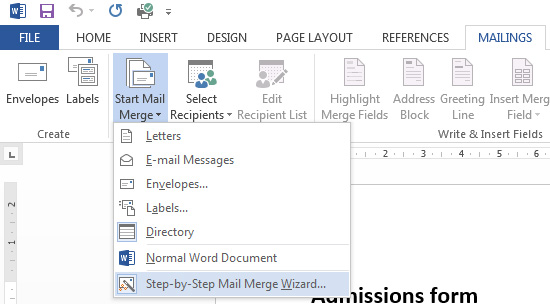
Open the Word document where you have designed the form. If you are using Word 2007, 2010 or 2013, then go to “MAILINGS” tab and click Start Mail Merge > Step-by-Step Mail Merge Wizard.
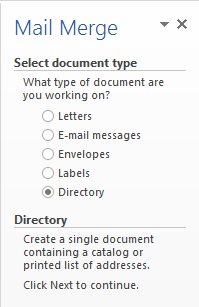
For “Type of document” choose Directory:
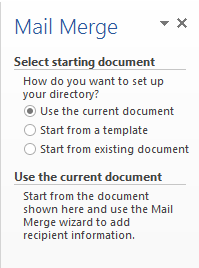
In the next step “Select starting document”, choose “Use the current document”.
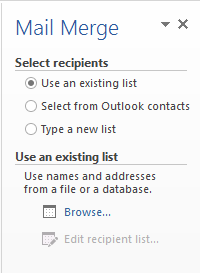
The next step requires you to select recipients. Choose the option “Use an existing list”, then click Browse and find the previously downloaded xlsx file:
After you have selected the excel file, on the Select Table window press OK, and then on Mail Merge Recipients window and click once again OK.
Now comes the most important part. You will need to match each source data field from the Excel table with the corresponding fields in the form.
Following the sample form I created in Word for explanation purposes, it will go like this:
Place the mouse cursor in the “Student name and surname” field and then from the “Insert Merge Field” choose the first option “Student_name_and_surname”
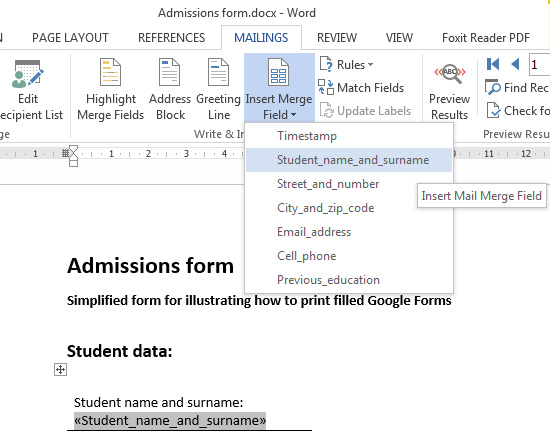
Complete this procedure until the last field in the form.
At the end, it should look like this:
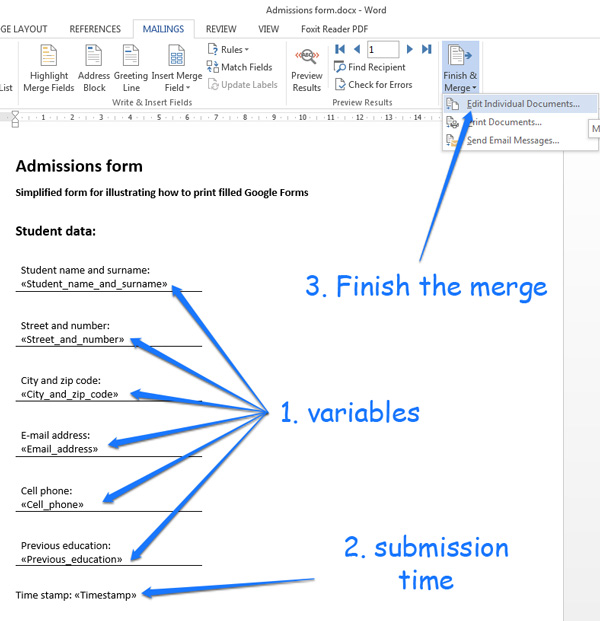
Next, click on “Finish & Merge” and select “Edit Individual Documents” or simply the keyboard shortcut Alt+Shift+N (merge to new document).
Tip: in order to prevent overlapping of the data entries, i.e. each new entry to begin on a new page, it is recommended that you insert Page Break at the end of the form template.
What Microsoft Word actually does is that it puts a kind of variable into each field of the form and then it starts fetching entries from the Excel file (file with people’s responses) and creates separate files in a row ready for printing. Do the necessary adjustments if needed.
Although this is a manual method, it is very helpful in situations when there is no process-automation with scripts. So, next step that will worth trying is automating all steps using specialized script.


Good Idea! Thank you
Bad idea! Write google script to print online form. Applicant requires the form and not the server.
Thanks Dinesh. That will be included in the next revision of this article. This is just workaround :)
Have you wrote about how to use the script?
Hello Nate, this is not a script but workaround how to print using Microsoft Word. There are also ways to print forms using scripts – you may find them on Internet.
found this article after a few days of searching.
Have to say I was a little nervous with the idea of having to merge two different files, but WOW, this is exactly what I needed to print, INDIVIDUAL forms for my students. Each student will get a form now that gives effective feedback about their final project.
To be honest, I kinda like this a bit more than Google’s Add-On’s…definetly not hard to setup at all!
Thank you so much Milan!
Thanks Jim!
In the preparation stage, how do you do design the outlook the google form as an offline version?
Hi. I use all the tools that I could potentially use in Microsoft Word, depending on how I want the form to appear: shapes, lines, page breaks. If you use Word 2013, go to the DESIGN tab and you will see the available options.
This was so very helpful! Thank you!
Thank you! Thank you! Thank you!
You just made my life so much easier. Thank you!
On the one hand, yes, from a technology standpoint, this does work. And, it works well. From a business process standpoint, it’s a train wreck. I implemented this workaround to automate a process in my office. I trained my staff to complete the mail merge in Word, PDF a document, then send back to the customer for their records. The result was very unhappy customers who complained about not having the ability to print their own hard copy of a form. It was a disaster.
Google, for the love of all that is effective and efficient, give us the ability to print forms. Business professionals use forms. If we wanted surveys, we’d use survey monkey. Give us forms!
Thanks for trying to address this maddening shortcoming from google. Can you please detail what you mean in step 1, ” Using Microsoft Word, design the outlook of the Google Form as offline version.” Are you saying create a table? Everything else is clear. Thanks
Not neccessarily creating a table, but to try to make the form in Word to look according your needs. Write a question, then insert line or draw a box for a long answer. You got it.
Thank you. That helped a lot. It still took me quite some time to add every field of my long questionaire, but it is the best solution I found.
There are addons for google forms which state to help you print out each answer individually, but I did not install them because I was not willing to give them all kind of rights (like reading all my emails and contact, writing emails in my name…) why do they need that??!
Anyway.
Thanks for great article, and especially for the screenshots! Helped a lot!
Greetings from Germany
Lisa
Thanks for all the details. I have collected individuals’ photograph also as jpg file upload in my google forms. The photos are stored in a separate folder in my google drive and a link to the same is provided in the form as a separate field. I want to print the photograph also but I get only the link printed. Is there any way to print the photograph also.
This really helped. It takes about 15min and you’ve got a Document which is printable with all the Informations you need.
What I need is to be able to print a Google doc that I’m submitting so I have a copy for my records (to save as a PDF, actually). An answer on a Google forum–for which the Reply button doesn’t work, or I would ask there–says just use the normal print function; I’ve tried that, of course, and it always gives me only the first page. Help!
I’m using Firefox on a Mac.
Hi, I’m looking at an easy way to send the students their marked google form with marks and feedback.
What’s the easiest method as I’m using the google form for assessment and class test need to upload the students google forms with marks.