Sometimes you may want to place a watermark on a picture. There are plenty of reasons: to protect your masterpiece, to promote a brand, a website and many more. You don’t need to be a graphic designer or a professional photographer with depth knowledge in complex photo-editing software like Photoshop or Corel for instance. You can make decent watermarks by using Picasa – free photo editing software from Google.
In this how-to guide you will see 2 options how to place a watermark text in a picture by using the Picasa software.
Option 1: Create a watermark by using the Export function
Simply select the photo and click the Export button.
Notice: you can process same operation on multiple photos at once. Before moving to the next step place all photos in a dedicated folder and select all photos using the keyboard combination Ctrl+A.
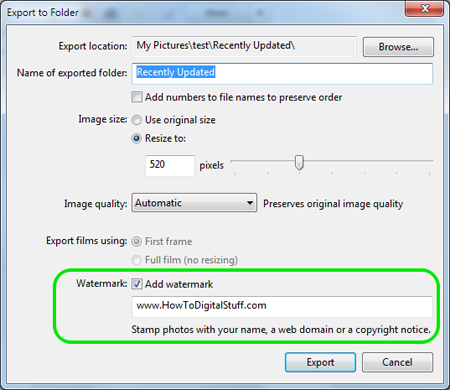
On the next prompt, select the check box “Add watermark” and type your own text in the text field below.
Click the Export button and you will find the processed picture located in the “Export location” path (the output folder will automatically open itself).
By default, Picasa adds watermark to the lower right corner of the picture. There is no option to change font, size or color of the text.
Option 2: Create watermark with customizable text
From the Library view (see picture 1), double click the picture you want to edit. It will take you to the Edit view mode.
Then, from the toolbar on the left, choose Text option. A contextual, action-toolbar will open.
Using this toolbar you can do modifications of the text such as: the font, its size, style, text color, solid fill color and transparency.
Click wherever in the text and you will see a kind of a ‘wheel’. Use this tool to rotate, set the angle and scale, as well as the position of the watermark within the picture.
After you finish with all adjustments, click the Apply button. Go back to Library view and see watermarked picture.


