If you are running a WordPress website or blog, as it is becoming more and more complex over the time, at a certain point you may need to use Google’s Webmaster Tools to check site’s health, understand search traffic, learn how users are finding your site, to analyze it, make necessary optimizations and a lot of other things – all in order to adjust it to Google’s standards and make it Google-friendly. In this how-to guide you will see how to verify WordPress site in Google’s Webmaster Tools using HTML file upload method.
Step 1: In order to use Webmaster Tools you will need a valid Google account. If you don’t have one yet, open one free account here . If you already have a Gmail account, you may use it as well.
Step 2: Visit Webmasters Tools website and sign in using your Gmail account.
Step 3: Right from the home page , type the website’s full address in the blank field and press the red button “ADD A SITE”.
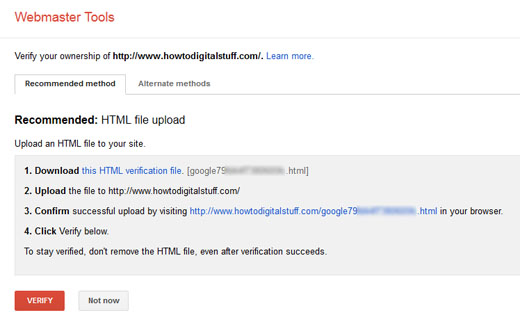
Step 4: In this step you need to verify ownership of your site, using the recommended method “HTML file upload”.
There are couple of sub-steps here:
- Download the HTML verification file. It is in format like google79bc48f9450605cf.html
- Now, open the FTP client (for example FileZilla), and log into the website.
- From the Root of the website, navigate to public_html folder.
- Upload the previously downloaded HTML file in public_html folder.
Return to the Webmaster Tools page in your browser and click the link in step number 3, “Confirm successful upload by visiting….” (see the picture above). If the upload was successful, you will see the verification code in a new blank page.
Finally, you are ready to verify your site.
Press red button “VERIFY“. You need to see a confirmation of success:
Your site is now ready to be analyzed by Google Webmaster Tools.


