There is a certain process to be followed in order to recover a Li Ion battery, and specific tools to be used along the way.
First you need to read the battery voltage using a multi-meter. If the voltage is below a minimum charging level than most likely the battery is in a “sleep mode” and you will need to jump-start it using a special Li-Ion charger with booster since it will not accept a charge from a regular Li-Ion charger. This will be the initial battery revival. Next, the battery must go through a few full cycles of charging and discharging. There is scientific proof that freezing batteries when empty and then fully charging them after turns out to be helpful when doing battery reconditioning.
Li-Ion batteries, or also known as Lithium Ion batteries are widely used across most of the modern electronic devices including: smartphones, laptops, cameras, personal tech gadgets, power tools, etc. They are rechargeable, they have high capacity, lower self-discharge, and pretty big number of charge cycles which make them hugely popular.
If you have a Li-Ion battery that seems to be dead, it is worth trying to revive it before recycling it.
Let me explain each of these phases a little more.
1. Battery deconstruction
If you are reviving a 18650 Li Ion battery or any single-cell battery you may skip this step. Otherwise, if you want to revive a laptop battery or power tool battery for example, then you will need to deconstruct it, because the actual battery cells you are looking for are packed inside the plastic case.
In order to take apart the plastic case you will need a proper spudger tool kit.

Considering the variety of battery cases available on the market I won’t be able to explain how to deconstruct them individually. However, using common sense and a little patience will help you in the process.
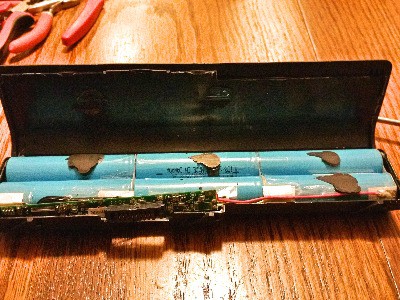
Here is an example of deconstructed laptop battery case containing 6 x 18650 Li-Ion batteries:

2. Read The Battery Voltage
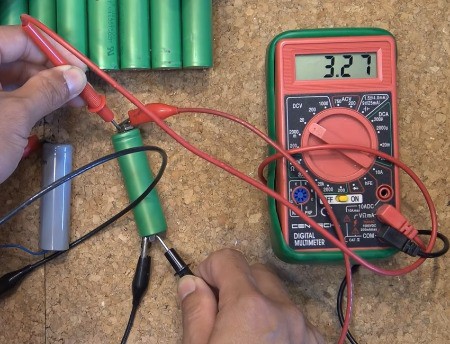
The first thing you do prior to battery reviving, is to read the voltage using a digital multimeter.
You need this information to see whether the battery has transitioned into sleep mode. Each Li-Ion battery has a protection circuit that acts as a safeguard that turns the battery off if the battery became over-discharged. This happens when the battery is not charged over a longer period. For most Li-Ion batteries the protection circuit puts the battery in sleep mode when it discharges down to any value between 2.2 and 2.9 V/cell, which depends on the manufacturer.
Any battery with a voltage below this “over-discharge” level it is not advisable to be revived because they are either dead so they will not take charge anymore, or even if they take charge the capacity will too low so the battery will be unusable.
3. Plug the Battery in Charger With Revive Function
Charger with revive function (also know as a charger with wake-up or boost feature) is pretty much different than the regular Li-Ion charger. Whilst the regular charger won’t charge the battery while it is in sleep mode, the battery charger with booster applies a small charge current that activates the battery protection circuit and if the cell reaches the nominal voltage, then the charger switches to the normal regime and continues to charge the battery normally. This is all done automatically by the charger.
Wait until the battery is fully charged.
4. Charge and Discharge the battery
After the battery is fully charged, note down the capacity and let it start discharging by sitting over the night or in the following days. Notice how fast they lose the charge.
Go once more through the charging/discharging cycle. Measure the battery capacity.
If it significantly lost the capacity, you should probably recycle it, otherwise there are good chances you have revived it successfully.
5. Freeze the battery
There are some scientific findings that freezing the lithium battery improves safety
 and battery life.
For that purpose, put the battery in an airtight bag, then put the bag in a freezer for around 24 hours. Make sure the battery is completely protected from moisture, so it can’t get wet.
Take the battery out of the freezer and let it thaw until it reaches the room temperature (usually it takes 7-9 hours).
6. Fully Charge The Battery
After the battery has restored to room temperature and no moisture is left behind, you should proceed with a full charge using your regular Li-Ion charger.
After freezing the batteries, they tend to lose their charge completely and we have to fully charge them once again.
Up until here you have completed all necessary steps to revive Lithium Ion battery. Hopefully, it was successful.
Can I Recondition a Battery at Home
You can do battery reconditioning at home with following considerations in mind:
- Basic knowledge in the field of electronics and electrical circuits is recommended. More particularly, you should know how to use a multimeter, how to measure the voltage, etc. If you are a DIY person with previous experience, then you should not have issues with following this guide.
- A work desk and proper tools: multimeter, appropriate Li-Ion chargers, and other tools mentioned throughout this article;
- Safety equipment: glasses, gloves, etc.
- Education: If you are a beginner and you want to tap into this field, taking a course will be very beneficial. There are various courses available online, however, there is one specialized course about battery reconditioning
 that is very popular nowadays. You can watch the FREE intro video here
 .
.
Needed Tools For Battery Revival
If you are asking yourself which tools you need to successfully revive (almost) any Li-Ion battery, here is the list:
- Digital multimeter – we need this tool simply to read the battery voltage, so we got an initial impression of the battery status. Fluke 107 AC/DC Current Handheld Digital Multimeter
 would be a good choice. It is mid-priced, and it will come in handy for other repairs, as well.
 - Lithium Ion charger with revive function – chargers that have this revive function operate a little differently than the original Li-Ion chargers. They are able to initiate charging even if the battery is in the “sleep” mode.
- Safety glasses
 – we must be cautious about our own safety. Working with old batteries could be risky.
 - Crocodile clips – these clips are used in situations when you don’t have a Li-Ion charger with revive function. In that case, a battery with similar specs is used as an external power source to awaken the dead battery from the sleep mode.
- Spudger tool kit
 – this is needed when you need to deconstruct specific types of batteries, such as laptop battery or power tool battery. I would recommend iFixit Pro Tech Toolkit
 as a universal repair kit for all sorts of electronic devices including computers, smartphones, tablets, etc.
 - Optional: a battery with similar specs as the battery being revived or USB cable. These are used when you can’t afford a Li-Ion charger with a revive function.
Tips for Extending the Lifetime of Lithium-Ion Batteries
If properly used, batteries can last longer than their average lifespan, but the opposite applies as well – if they are used wrongly then their lifespan will be very short.
A research group from the University of Michigan after doing a thorough investigation on this subject has sublimated the following general tips for extending the Li-Ion batteries lifetime:
- Minimize exposure to high temperatures in storage or use;
- Minimize exposure to low temperatures, especially when charging;
- Minimize time spent at 100% charge;
- Minimize time spent at 0% charge;
- Avoid using fast charging unless needed;
- Avoid discharging devices more quickly than is needed;
- Avoid use or storage in high moisture environments;
- Avoid mechanical damage;
- Follow manufacturer’s calibration instructions;
How To Revive 18650 Lithium Ion battery
18650 Lithium Ion battery is a single cell battery that can we revived using another power source such as Li-Ion charger with analyzer function (also know as charger with wake-up or boost feature), or alternatively if you can’t afford that sort of charger you can try using a second 18650 battery, a working one, that will serve as a power source to the dead one. Remember that the battery is not dead until it is proved to be dead.
For reviving 18650 battery using this alternative method you will need the following tools: digital multimeter, crocodile clips, a working 18650 battery cell, regular Li-Ion charger and safety glasses.
Here is a great video that explains the method of reviving 18650 battery using another 18650 battery as power source:
How to Revive a Laptop Lithium Ion battery
Reviving a Li-Ion laptop battery follows the same process as with any Li-Ion battery, as described in steps 1 to 6. However the first thing you need to do is to deconstruct the laptop battery. Most of the laptop batteries contain 18650 Li-Ion battery cells packed in plastic cases along with the battery controller. You should be careful when opening the battery pack in order to avoid damage of the parts.
How to Jump Start Lithium Ion battery
In general, there are 3 ways to jump start a Lithium Ion battery that seems to be dead.
The first and the best way is to use a Li-Ion charger with analyzer, or with revive function. Unlike the regular chargers, this sort of chargers will first apply small charging voltage so the cell will regain the minimum required voltage so that the battery protection circuit will be activated. After reaching this point the charger will continue with the normal charging mode.
The second way is to use a working battery that is with the same or similar specs as the battery you want to revive. You will need to apply parallel charging with the same purpose: to apply a small charge to the dead battery so it can regain the minimum necessary voltage so the charging could continue using a regular Li-Ion charger. The average time to do parallel charge is 30 seconds. Remember that the point is to increase the voltage of the dead battery just enough so the Li-Ion charger can “recognize” the battery and continue with charging.
Take crocodile clips and touch the red wire on the positive terminal on both batteries. Touch the black wire on the negative terminals on both batteries. As soon the circuit is closed, the charging begins.

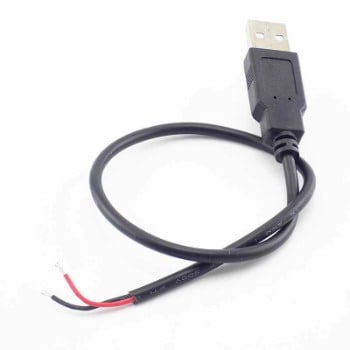
The third way is to use a USB cable where the smaller end is cut off. You can do this yourself by using a USB cable, or you can also buy this sort of cable in the IT stores already pre-made. The idea is to touch the red wire on the positive terminal of the battery and the black wire on the negative terminal. The other end – the male USB you will plug into your computer. The voltage that goes through the USB port is 5V so it will be enough to power up the dead battery. Keep the battery connected for about 1 minute and measure the battery voltage using a multimeter.

Attention: in all cases, closely monitor the battery temperature! It is fine if it gets warm, but if it becomes hot then disconnect it from the circuit as soon as possible and stop trying anything else. The battery may be discharged below the critical level and may not be revived. Hot battery also means that battery may be degraded too much, and in some cases it may explode.
What Do You Do with dead Lithium batteries?
If you have tried to revive a dead Li-Ion battery and you didn’t succeed, or you noticed some abnormalities (battery doesn’t get charged or becomes very hot), then you should recycle the battery.
What Temperature is Bad for Lithium Ion Batteries
Lithium-Ion batteries operate normally within a defined temperature range, which ideally is between 15°C and 35°C. Temperatures higher than 35°C will cause battery degradation, whilst temperatures below 15°C will lead to sluggish electro-chemistry which will further decrease power capability.
| Battery type | Desired Operating temperature | Operating temperature | Charge advisory |
| Li-ion | 15°C to 35°C (59°F to 95°F) | 0°C to 35°C (32°F to 95°F) | No charge permitted below freezing. Good charge/discharge performance at higher temperature but shorter life. |
 | huawei.com
Tech specs for most common Lithium Ion batteries
| Chemistry | Lithium Cobalt Oxide | Lithium Manganese Oxide | Lithium Nickel Manganese Oxide | Lithium Iron Phosphate | Lithium Nickel Cobalt Aluminum Oxide | Lithium Titanate Oxide |
| Short form | Li-cobalt | Li-manganese | NMC | Li-phosphate | Li-aluminum | Li-titanate |
| Abbreviation | LiCoO2 (LCO) | LiMn2O4 (LMO) | LiNiMnCoO2 (NMC) | LiFePO4 (LFP) | LiNiCoAlO2 (NCA) | Li2TiO3 (common) (LTO) |
| Nominal voltage | 3.60V | 3.70V (3.80V) | 3.60V (3.70V) | 3.20, 3.30V | 3.60V | 2.40V |
| Full charge | 4.20V | 4.20V | 4.20V (or higher) | 3.65V | 4.20V | 2.85V |
| Full discharge | 3.00V | 3.00V | 3.00V | 2.50V | 3.00V | 1.80V |
| Minimal voltage | 2.50V | 2.50V | 2.50V | 2.00V | 2.50V | 1.50V (est.) |
| Specific Energy | 150–200Wh/kg | 100–150Wh/kg | 150–220Wh/kg | 90–120Wh/kg | 200-260Wh/kg | 70–80Wh/kg |
| Charge rate | 0.7–1C (3h) | 0.7–1C (3h) | 0.7–1C (3h) | 1C (3h) | 1C | 1C (5C max) |
| Discharge rate | 1C (1h) | 1C, 10C possible | 1–2C | 1C (25C pule) | 1C | 10C possible |
| Cycle life (ideal) | 500–1000 | 300–700 | 1000–2000 | 1000–2000 | 500 | 3,000–7,000 |
| Thermal runaway | 150°C (higher when empty) | 250°C (higher when empty) | 210°C(higher when empty) | 270°C (safe at full charge) | 150°C (higher when empty) | One of safest Li-ion batteries |
| Maintenance | Keep cool; store partially charged; prevent full charge cycles, use moderate charge and discharge currents | |||||
| Packaging (typical) | 18650, prismatic and pouch cell | prismatic | 18650, prismatic and pouch cell | 26650, prismatic | 18650 | prismatic |
| History | 1991 (Sony) | 1996 | 2008 | 1996 | 1999 | 2008 |
| Applications | Mobile phones, tablets, laptops, cameras | Power tools, medical devices, powertrains | E-bikes, medical devices, EVs, industrial | Stationary with high currents and endurance | Medical, industrial, EV (Tesla) | UPS, EV, solar street lighting |
| Comments | High energy, limited power. Market share has stabilized. | High power, less capacity; safer than Li-cobalt; often mixed with NMC to improve performance. | High capacity and high power. Market share is increasing. Also NCM, CMN, MNC, MCN | Flat discharge voltage, high power low capacity, very safe; elevated self-discharge. | Highest capacity with moderate power. Similar to Li-cobalt. | Long life, fast charge, wide temperature range and safe. Low capacity, expensive. |


The reason for the need to deconstruct any battery pack was not explained. I suppose that the reason is to bypass the protection circuit of the battery pack so that the power source used for jump start can be connected directly to each cell of the battery pack. In other words I suppose that the pretection cicrcuit of a battery pack prevents jump start of the pack.
Hi Martti, you actually summarized the answer in a very good way :-)
Thank you for this page that is very interesting and useful for understanding how to relive an lithium-ion battery.
There are just 2 points that you should be change :
1) Freezing a commercial battery is a very bad idea : that’s a condition that can likely lead it to internally short-circuit & burn ; the article you cite intend the use of freezing as a manufacturing step in order to induce a specific conformation of a ceramic electrolyte that is not the one present in commercial batteries. you’ll notice that after this step they put the result in vacuum in order to vaporize the water initially present in the electrolyte and then keep only the solid remainder before they inject a polymer that maintains it.
All of these steps are intended to be performed on bulk material before using it as a layer in the cell structure and can’t be performed on a commercial battery.
As far as I understand, inside any kind of electrolytic cell there can be dendrite growth partly with with aging but also freezing (see below).
Frrezing also it leads to the contraction and enbrittlement of the polymer that risks to be perforated by these dendrites and increase the risk of internal short-cut => very low temperatures are to be avoided for safety reasons.
see : https://www.sciencedirect.com/science/article/pii/S1002007118307536
“Another typical effect that occurs at low temperatures is lithium plating [79], [80], [81]. The cold condition will trigger the polarization of anodes and lead to the approach of the potential of graphite and other carbon based anodes to that of lithium metal, which would slow down the lithium-ion intercalation into the anodes during charging process [82]. The aggregated lithium ions are thus deposited on the surface of the electrodes, which causes the reduction of the battery capacities. Furthermore, the lithium plating exists in the form of dendrite, which may penetrate the separators, and result in the internal short-circuit [83].”
2) The second thing you should reconsider are methods 2 & 3 for reviving:
Its litterally short-circuiting the cell with either the other cell or an USB 5V ; in either case (especially the one with the other cell), you’ll inject a short-circuit current of the source into the cell to be revived and risk to overheat both cells and/or to kill the USB source (especially if it’s a computer).
If you want to try this kind of thing, you should insert a low value power resistor (e.g. a 1 to 4.7Ohm one with at least 5W rating) between the power source and the cell to be revived, it will dampen the current and make all this safer.
If you have 1 or several references of Li- charger with revive/boost function, I’m interested in getting it :-)
Thank you for the feedback Yves, I’ll take a look once again.
As for the Li-Ion charger recommendation, if I found something decent I will get back :)
I agree with Yves comments.
One such charger I found was inbuilt into my 13Ah Trust Powerbank.
The powerbank was to my surprise empty with dead cells. Possibly to an inbuilt flash-light function engaged by mistake. I expected the powerbank to be toast as I could not notice any life despite measuring 130mA current consumption.
However, I was curious and opened the battery pack and found five 18650 cells in parallel together with a charging circuit and two 5V DC-DC converters.
I measured the cell voltage to be 0.7V initially, but connected it to a laptop USB port in series with a current meter and tried charging it with the 130mA it took.
Very slowly the cell voltage increased during at least 6-8 hours up to about 2.6V and then it dropped to 0mA current.
Encouraged by the new high voltage near 2.5V, I unplugged and plugged the charging cable again and found the current to be back to 130mA.
The next day, the charging current was normal around 600mA (what the laptop maximum could give) and about 15 hours later reached full charge.